How to Design for Additive Manufacturing: First Steps

Topology-optimized bottle openers 3D-printed with minimal support material. (Image courtesy Olaf Diegel)


Latest News
October 24, 2017
In recent years, software tools such as Autodesk Within and Altair solidThinking Inspire have directly tackled rethinking mechanical design from a blank piece of paper, to reduce product weight while maintaining strength and to optimize designs specifically for AM production.
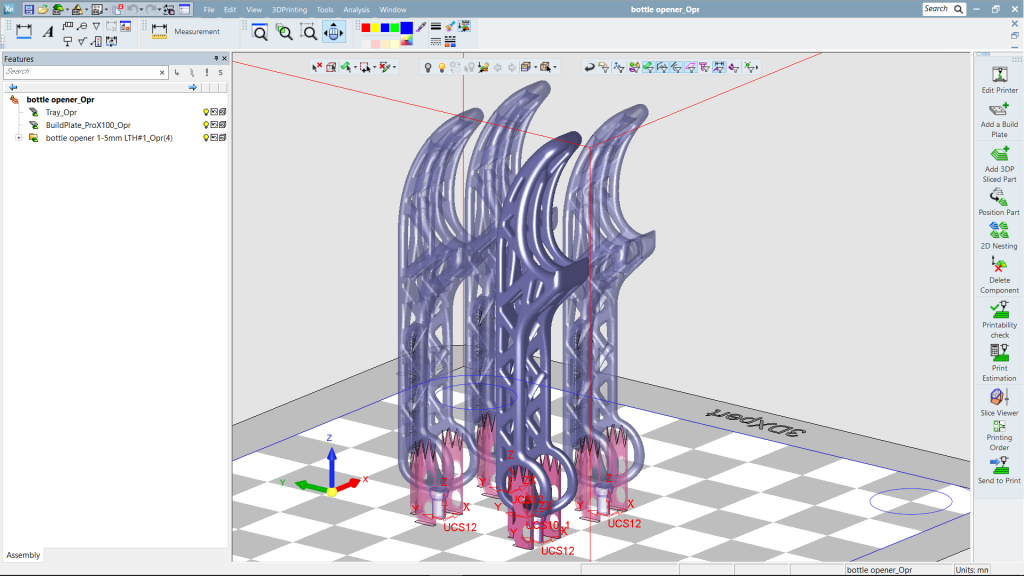 Topology-optimized bottle openers 3D-printed with minimal support material. (Image courtesy Olaf Diegel)
Furthering a Design for Additive Manufacturing (DfAM) philosophy, Autodesk netfabb and Materialise 3-matic and Magics packages, for example, support various aspects of mesh editing, slicing, part nesting and generation of supports and lattice structures, as well as topology optimization and distortion simulation for metal parts.
And end-to-end solutions from software power-houses — e.g., Siemens PLM Software’s NX for Additive Manufacturing and Dassault Systèmes’ 3DExperience platform — continue to evolve in support of DfAM.
But how does one first step back, see the big picture, and mentally shift gears to take full advantage AM’s design freedom? The following checklist from Wohlers Associates offers great insight to get started on this topic.
Stepping up to Successful Design for Additive Manufacturing
Complementary to, but different from classic Design for Manufacturing (DfM), DfAM not only looks at the bare-bones function of a part and its classic assembly techniques, but addresses just how to produce it with additive manufacturing (industrial 3D printing) equipment/materials to gain efficiency on many fronts.Terry Wohlers, founder of Wohlers Associates, has spent decades as a consultant in the evolving AM industry. Together with associate consultant Olaf Diegel (professor of Product Development in the Faculty of Engineering at Lund University, and known for his 3D-printed musical instruments), the two have summarized seven aspects of design that can bring higher value to an AM-produced part.
1. Design (or modify an existing design) for minimum material that meets functional specs. By optimizing the design to put material just along the direction of force vectors, unnecessary wasted material (that would be cut away with subtractive processes) would not be needed in the first place. Use tools such as topology optimization and lattice structures to make light and more efficient products.
2. Design for part consolidation. Converting an assembly of many smaller parts into a single, integrated, highly custom shape means that the entire piece is printed at once. Moreover, eliminating the need for assembly also eliminates the need for the inventory of many components (plus screws, bolts, nuts, washers, etc.) and the time, cost and potential errors involved in assembly steps—such as bolting or welding—and maintenance.
3. Design (or modify an existing design) for minimum material that meets manufacturing process specs. In AM, large masses of material offer little engineering benefit and can induce considerable residual stresses. In turn they require more support structures to anchor and combat the added stresses. Also, they greatly increase print times and costs.
4. Design for improved function. For example, a cooling channel traditionally machined in a straight line in a tool for plastics injection molding can instead be a curved line that conforms to the shape of the end-part and provides faster and more even cooling.
5. Design for optimized material type. Explore the possibilities of 3D-printing a part in a material that is traditionally difficult to machine or form, to gain the benefits of better material properties such as thermal conductivity, malleability or strength. Consider not what material the part has been made of in the past, but rather what functions it must perform and then choose the most suitable available AM material.
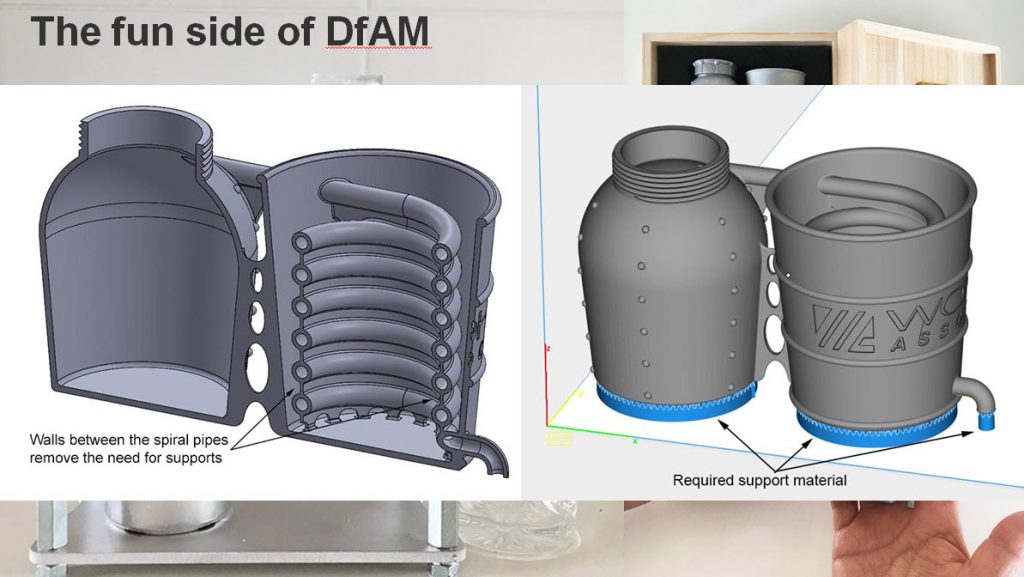 Concept for a 3D-printed mini-distillery, whose layout demonstrates integrated tubing and minimal supports (in blue, to be removed later). (Image courtesy Olaf Diegel)
6. Design for optimized build-orientation and minimal support structures. Since many 3D-printed parts require support structures, even within powder-bed production (e.g., anchoring a metal part to its build plate to avoid warping, and supporting inclined sections to avoid drooping), material is added just for supports. It must be removed later, which can be a painstaking and time-consuming manual task. This post-processing can represent 70% of the part’s total cost. Shrewd part orientation can minimize the need for supports, while thoughtful part design can even swap out removable support structures with clever integrated elements and features.
7. Design for efficient and traceable workflow. Evaluate and specify all tasks involved in the production of an AM part, from pre-processing (nesting in the build-volume, defining build-parameter settings, etc.), to process monitoring, to post-processing (support removal, heat treatment, cleaning, UV-curing, surface treatment–whatever the particular process requires). Include recording parameters from the build process for later review or real-time control, for continuing process improvement and/or in support of relevant quality standards.
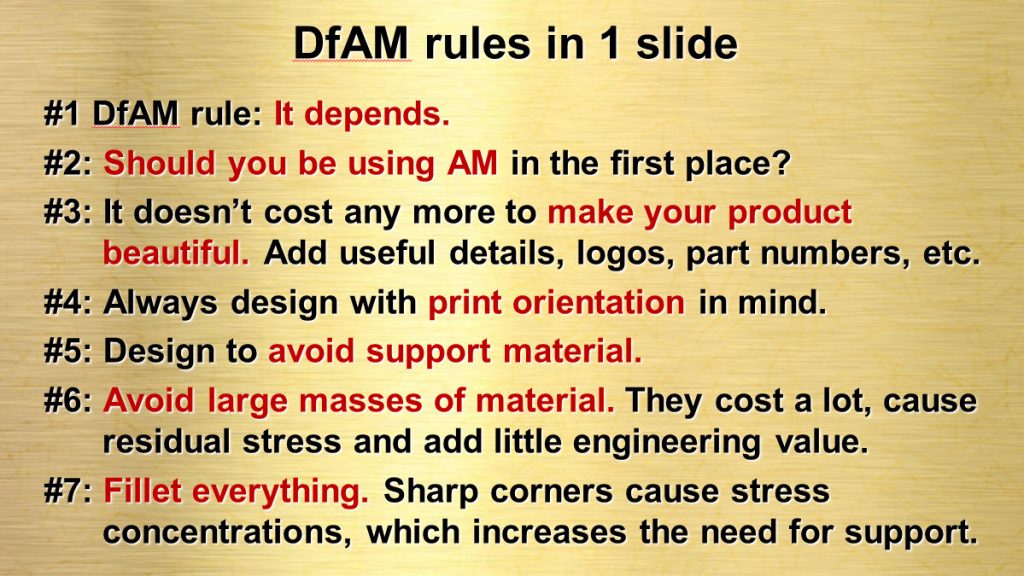 Design for Additive Manufacturing Rules on a single page. (Image courtesy Olaf Diegel)
Learning from Experts and Each Other
With Diegel as the lead instructor, Wohlers Associates has presented 3-day courses covering these steps in depth for NASA and clients in Europe. Wohlers says that the positive response has confirmed the need for high-quality DfAM instruction and hands-on learning. He adds, “It is clear that people learn more when they engage in actual design exercises, both individually and as part of small teams. With this type of guidance, those involved can use their favorite CAD software, along with products such as Magics from Materialise, Inspire from solidThinking and Netfabb from Autodesk.”Wohlers observes that building parts and evaluating the results can be satisfying, and the learning that occurs, especially when a build fails, can be significant.
Subscribe to our FREE magazine, FREE email newsletters or both!
Latest News
About the Author
Pamela Waterman worked as Digital Engineering’s contributing editor for two decades. Contact her via .(JavaScript must be enabled to view this email address).
Follow DE

