3D Printing Recipes Save Time, Ensure Results

Optomec LENS 3D-Printing technology in action. (Image courtesy Optomec


Latest News
September 21, 2017
When you want to grill a steak, wouldn’t it be great to have Gordon Ramsey at your side, giving directions and expert tips? This master chef would probably suggest different preparation steps, grilling temperatures, grilling time and resting time depending on the type of meat (e.g., beef versus buffalo), the cut (Delmonico or T-bone), and your personal specifications/preferences for the final result — perhaps medium rare.
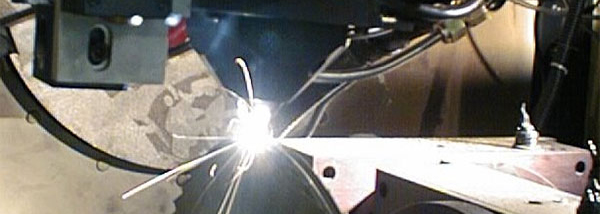 Optomec LENS 3D-Printing technology in action. Image courtesy Optomec.
Offering comparable expertise, but applied to 3D printing metals and other materials, Optomec has now published highly detailed, vendor-specific guidelines for additive manufacturing (AM) on both its LENS (laser engineered net shaping) and Aerosol Jet systems. The company’s material scientists and process engineers have compiled what they term “Starter recipes” that give customers an optimal set of system parameters for dozens of raw materials either in powder (LENS) or liquid (Aerosol Jet) forms.
Recipes for 3D-Printing Excellence
“These material starter recipes are very valuable to our customers because it gives them a starting point to build their own process for a given material or a given geometry,” says Ken Vartanian, Optomec vice president of Marketing.LENS systems use a high-power laser (500W to 4kW) to fuse powdered metals into fully dense 3D structures. Materials include titanium, nickels, tool steels, stainless steels, aluminum and cobalt chrome, and applications include part production, enhancement and repair. Starter recipes for the various LENS models state optimized process parameters for the laser, optics, powder feeder, atmosphere and layer/deposition geometry. Expected mechanical properties and microstructure are given.
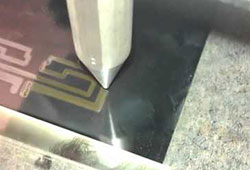 3D-printing a dual-band antenna on an existing part, using the Optomec Aerosol Jet additive manufacturing system. Image courtesy Optomec.
The Aerosol Jet process is designed to 2D and 3D print electronics and more, and works with any material (other than energetic/explosive particles) that can be suspended in a liquid (solvent) suspension, including electrically conductive inks, resistive inks, non-metallic conductors, dielectrics, and even biological materials. Depending on the set-up of the dispensing nozzle(s), two materials can be deposited during a single build, or even blended on the fly.
A sample Starter recipe for a silver ink (viscosity 20 centipoise) from supplier SunChemical includes more than a dozen operating recommendations, such as: use the Aerosol Jet system’s pneumatic atomizer (not the ultrasonic one) to better create droplets at this viscosity, choose the “fine feature” print head, work with the 300-micron nozzle tip, and set the nozzle-to-substrate stand-off distance at 4 millimeters. The recipe also instructs users to dilute the silver ink into the recommended solvent, and states optimum settings for atomizer flow rate, sheath (focusing) gas flow rate, exhaust flow rate and print speed. Lastly, the datasheet gives sintering (curing) recommendations and values for expected printed line width, line thickness and resistivity.
 Pages from a sample Starter Recipe for 3D Printing electronics using an Optomec Aerosol Jet printer. The sample lists optimized parameters for 3D-printing with a silver ink from SunChemical. Image courtesy Optomec.
Prepping for Lights-out AM Production
Looking to the not-too-distant future, Vartanian notes that while these recipes work like a kick-start — saving customers weeks of trial and error vs. doing it on their own — it’s just the beginning of a greater endeavor. “Our vision,” he explains, “is to take this to a second and even a third level. Beyond the Starter recipes are what we call Production recipes, and we have a few of these already. These are recipes that have been proven to run reliably during longer, production runs (four hours or more).”Also called “Starter Plus” recipes, these material-specific libraries list process parameters optimized for an extended period of printing on LENS or Aerosol Jet systems, along with value envelopes for expected print results (including its process capability index/cPk). A given Production recipe can include electrical and mechanical performance against a given set of process parameters, or, specifically for electrical circuit printing, data such as ASTM adhesion behavior before and after environmental testing.
“We have a few Production recipes already,” says Vartanian. “For example, if you’re depositing a silver nanoparticle ink, at a certain deposition rate – say, 10 mg/minute – and it must maintain that same 10 mg/minute for four hours of continuous operation, and it can’t vary by any more than +/-10 percent, we’ve tested and developed a process where the output rate will perform within those control limits. (For example, employing a solvent refresh-rate to maintain the particle/solvent ratio, based on a closed-loop sensor-feedback system.) “It takes much longer to develop these kinds of recipes,” he adds.
Moving 3D-Printed Components up the Design Chain
Both of these guideline sets focus on setting up and operating Optomec equipment. “The third level that we’re looking at,” adds Vartanian, “takes these concepts all the way back to design engineering. If an engineer wants to design a strain gauge or an antenna, we plan to provide CAD files (with process parameters and tool paths) that are designed around the Optomec process.” The end goal is a library for designers: They will select a component (e.g., a strain gauge that needs to be printed on a particular substrate and measure strain between a given range of values), then the design file will provide the materials needed, the process parameters and the tool path for printing.“It will be just like them buying a physical component, but instead we are going to give them the software components that are printable,” he says. To Vartanian, this is a big effort, but provides one of the missing links in AM: “You need to go up the food chain, and equip the designers with the tools that they need to successfully produce products with AM. We do this now for our customers, but we want to be able to empower them to do it for themselves.”
Subscribe to our FREE magazine, FREE email newsletters or both!
Latest News
About the Author
Pamela Waterman worked as Digital Engineering’s contributing editor for two decades. Contact her via .(JavaScript must be enabled to view this email address).
Follow DE

